Installation Process Of JDeveloper
Step1:-
First wou need to download the JDeveloper patch of the version.
All the patches we can download from Oracle Meta link, and
the file size is
500+ MB.

Step2:-
Extract the ZIP file and open the patch folder you will find three
folders.
>jdevbin.
>jdevdoc.
>jdevhome.

Step3:-Go
to
Jdevbinàjdevàbin
Their u find jdev and jdevW icons.
The jdev is for UNIX environment and jdevW
is for Windows environment.
Create the shortcut of jdevW. And send to
desktop

Step4:-Next
we have to create the JDev environmental variable for windows.
>Right Click on My Computer select
properties.
Properties--> Advanced System Settings--> Environment veriable
next
click on New Button for adding a New User variable as show in the
below figure.

>Next select Advanced System
Settings.

>Next Select
Environment Veriables.

>Click on new to
create new environment veriable.

>Give the Variable name--> JDEV_USER_HOME
Variable Value --> path of the jdevhome\jdev


Step5:-After
creating the environment veriable we have to move the DBC file
from Oracle Apps fnd top to jDeveloper
patch.
Here we are using WinScp which connects to the
server from our desktop system.
After finding where
exactly the DBC file located go to that particular path and copy the DBC file.
(/oracle/apps/r12/inst/apps/visr12_ebsr12/appl/fnd/12.0.0/secure)
After copying, in
your desktop system go to
Jdevhome-->
jdev--> dbc_files--> secure
Here we will not find
any files or documents the folder is empty now we need to paste the DBC file
which we copied from the Oracle Apps Instance Server.

|
Step6:-After
moving the DBC file now open the JDeveloper and create the
Data Base Connection.
After opening the file
it will ask for Configure File Type Associations, on check box check all the available types to
associate with JDeveloper.
Go to Connections tab
after that Right Click on Data Base folder and then select New Database
Connection…,

After selecting the New
Database Connection,the welcome window will open just click on next.
After that in nex
window give the connection name. Make sure that Connection type should be
Oracle(JDBC), click next.

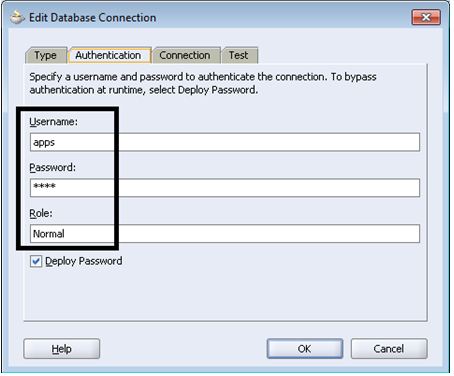
In the Authentication
tab specify the username and password,
give Oracle SQL
Developer tool connection name.
Next
in connection tab give the connection details
Host Name:-ebsr12.com
JDBC
Port :1521
SID :visr12
Click
next

Next in test tab click
on test connection and check for the
connection is it success or not.

Step7:-After
creating the DataBase Connections,
Set the default project properties.
Go to Tools à Default Project Properties

In that select Runtime
connection, adjust the runtime connection information, necessary for the database and Oracle E-Business Suite.
Brows the DBC file from
the jDeveloper patch where we moved from the server.
(Jdevhome--> jdev--> dbc_files--> secure)
Username:- The user name is Oracle Apps instance User
Name(sspatil)
Password:- Password is Oracle Apps instance Password.
Application Short
Name:- In which application u want to run
give the
Application Short
Name of that application.
Responsibility key:- Responsibility key of
that application short name.

This finishes the configuration of JDeveloper.
while creating a new project jdeveloper creating the project in jdevbin even after changing the path to jdevhome
ReplyDeleteSame is happening
DeletePlease suggest solution
ReplyDelete